Shooting XXL Wreck Panoramas Underwater
Prelude
Considering the limited visibility we have underwater, photographing a complete 50m+ (165+ ft) long wreck appears unfeasible, unless you could empty the sea around it! This is why wreck photographs typically showcase only a fraction of the vessel, such as the stern, the bow or other recognizable features.
Well, that is unless you’re Nicolas Barraqué, a French photographer who has perfected the challenging technique of taking complete wreck panoramic shots underwater, which he explains in this guest post.
The problem
Underwater, visibility is the deciding factor. It depends on available ambient light, on the presence of organic life or particle in the water column (sand, silt) but also on variations in salinity (halocline) and temperature (thermocline).
Visibility also varies per location: 15-20m(48-66 ft) would be considered good in the Mediterranean sea, less than 15m in the Atlantic Ocean, and definitely over 20 m in tropical waters. Consequently, when you stand at the middle of a wreck that is over 50m long (165ft), its edges will be lost in the blue: you won’t see the bow & stern of a boat, nor the tips of an aircraft’s wings.
In an earlier article (Plongez! Magazine, issue #16) I covered how to produce good underwater panoramic photos from a fixed point, using software such as Photomerge (in Photoshop), but this suffices only for small wrecks.
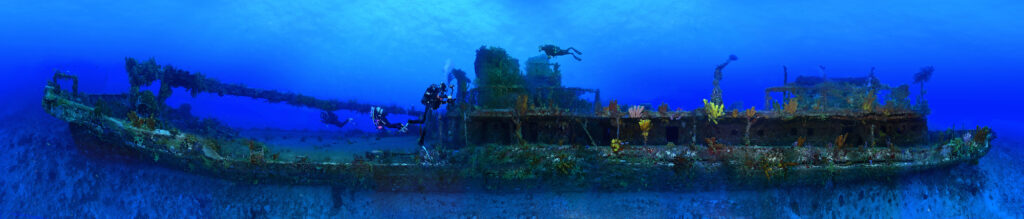
Due ot the length of the wreck (66m / 178 ft) the tips of the wreck are beyond the limits of visibility.
The solution
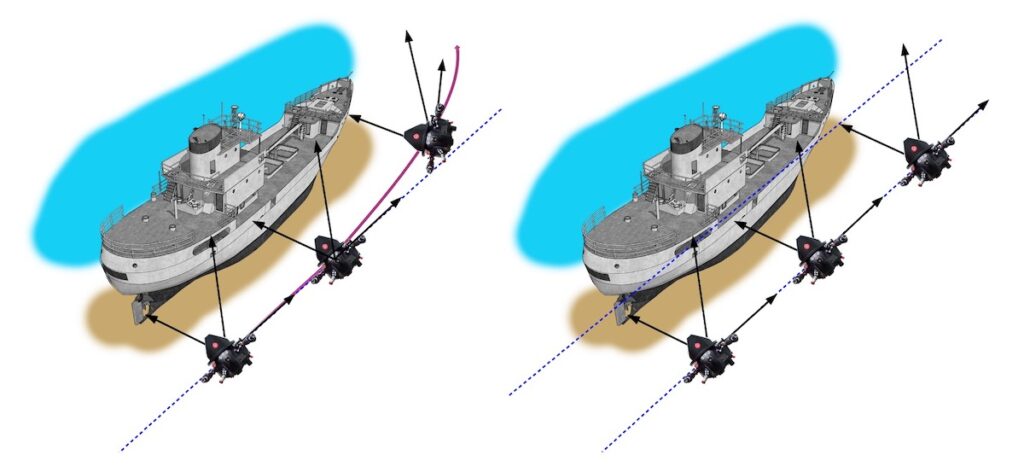
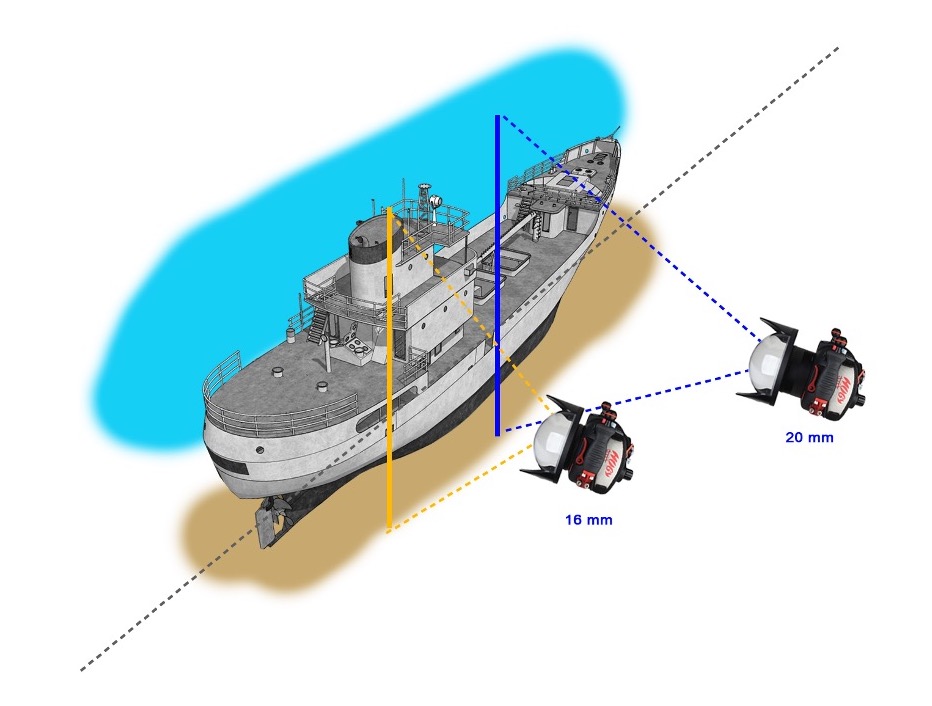
When it comes to representing a larger wreck with all details, the only option is to move along the whole vessel, while taking photographs of every section. Pay attention to your position when doing so! The trick is to swim along an imaginary line, which runs next to the wreck. You can use a visual reference such as a line on the hull, but make sure you’re swimming straight, instead of following the curve of the ship. While you’re on the move, make sure your camera stays perpendicular to that imaginary line, or if it’s tilted, make sure the tilt angle doesn’t change.
Keeping settings constant
Your camera settings must stay the same for the whole series of shots: set your shutter speed to at least 1/125th (to avoid motion blur), close-down the aperture to a minimum of F/11 to get enough depth of field, and adjust the ISO value to get a proper exposure.
Of course, you need to take vertical shots and be ready to take a lot of them: you need at least 60% overlap between two consecutive photos, to avoid parallax issues.
The more shots you assemble, the more details in the final image, with the drawback of a growing file size, which can get huge.
Lens choices
Putting visibility aside, you still need to cover the whole wreck vertically, which will depend on ship’s maximum height, and on your lens’ field of view. You also want to include some sand and water background in the composition, which calls for a wide-angle lens.
Ambient light, artificial light, or a mix?
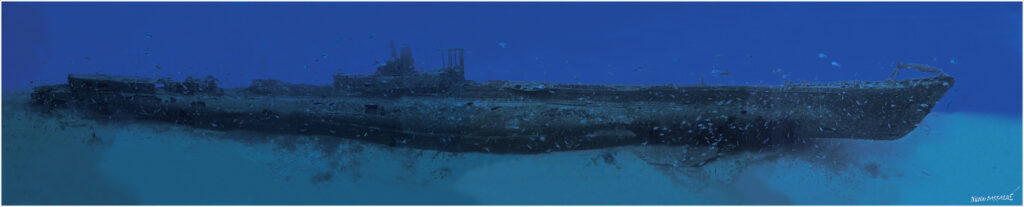
Ambient-light only shots can produce highly photogenic wreck panoramas. They offer a great advantage to beginners with this technique: you can be more distant from the wreck, hence require less images for the final assembly.
Things get complicated when you add artificial light! With strobes, you’re getting limited by recycle time, which result in brightness inconsistencies on the shots. That’s why I recommend video lights, which will deliver a constant illumination, as you swim along the wreck. As a consequence of video lights, you need to get closer to the subject, which in turn dramatically increases the number of shots that must be taken.
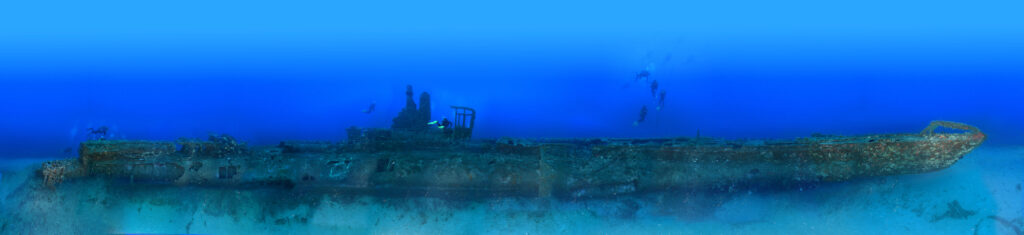
Depending on the subject, another approach is the “mix”, whereby other divers are asked to point their continuous lights at the wreck while the photographer is on the move. This will enhance the final image with spots of lights along the wreck, and a human presence. Of course, this requires a team of support divers and good coordination.
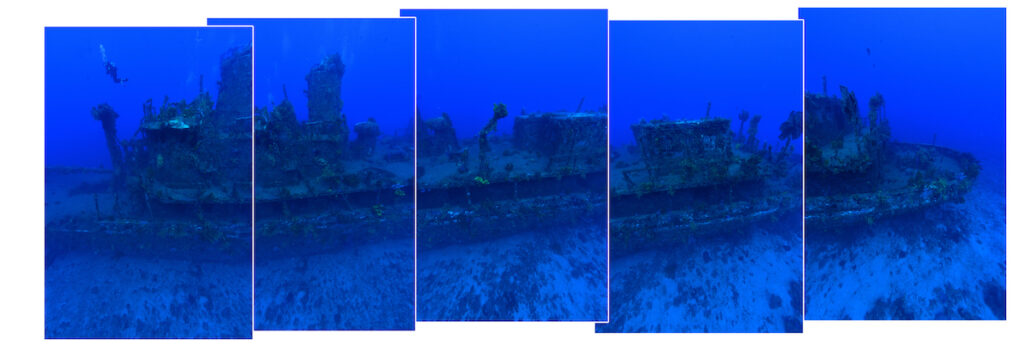
Mastering the assembly
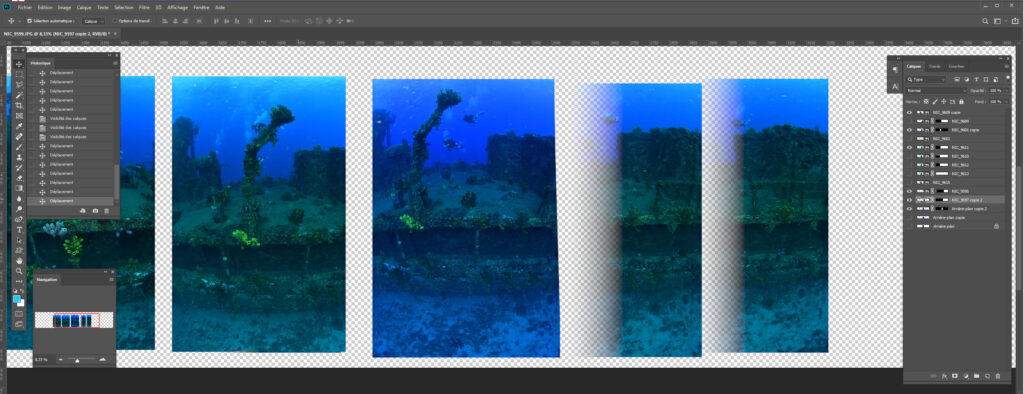
The final images assembly is done in Photoshop, which starts by setting up a working zone large enough to cover the final wreck image. All images are inserted as layers and the assembly is done manually, by overlaying consecutive photos, and applying a gradient mask to merge them smoothly. When fish and divers appear on several images, use a brush to make the disappear as needed, keeping them visible only on the shots where they seem best positioned. After the assembly is completed, you finish the editing with your normal exposure, contrast, tone and local colour adjustments.
That sort of panorama does require good editing skills and many hours of labour, but it can produce surprisingly good results, with a rewarding, never-seen-before view of the complete wreck. This is the sort of imagery which calls for the largest prints, to be fully appreciated.
Let me now share some of my favourite XXL wreck panoramas, and the story behind them.
The Satil shipwreck, Eilat (Israel)
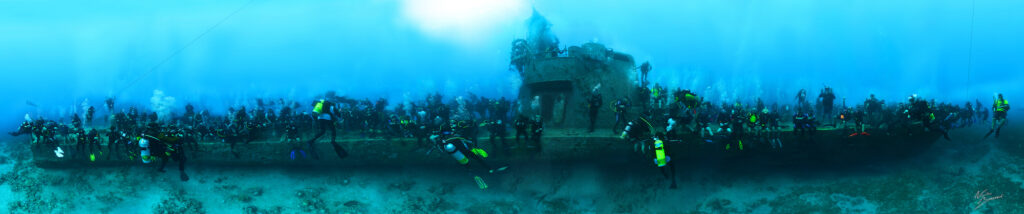
The idea being this shot all started during the Paris Dive Show, taking a crazy bet with the organiser of the World Shootout in Eilat: the challenge was to get together 500 divers for a Guiness World Record. Madness appears to be contagious: over 280 divers took part in the exercise that day! Military-style organisation: 25 buoys were deployed at the surface and 28 groups of 10 divers (each including an instructor), all went in on the same signal, found a spot on the wreck and were to remain still. Ten minutes later, I had finished taking my shots and all returned to the surface. I ended-up over-exerted, as I had just completed a round-trip along the wreck while doing my best to remain stable and with a constant framing angle, taking over 300 shots! The day after when I skimmed through the images I wasn’t sure it would work, but after a week of editing work, the end-result was stunning. You could recognize every single diver and even read some SPGs! This photo got exhibited during the 2015 BOOT show in Dusseldorf, over a 20 meters long print.
The Augustin Frenel (Guadeloupe)
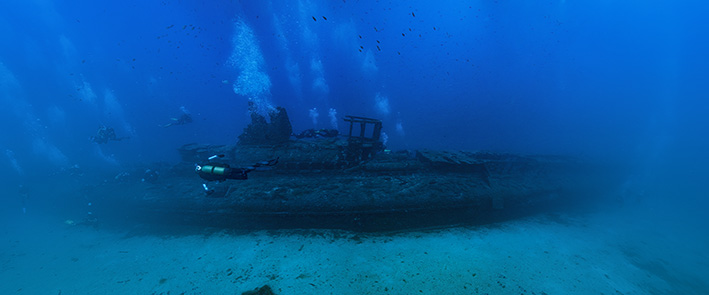
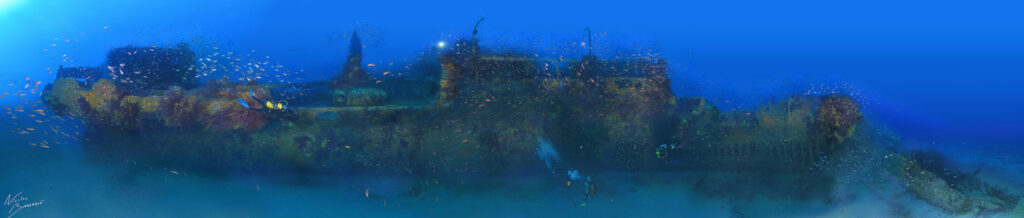
In January 2021 I flew across the Atlantic to Guadeloupe islands (in the Carribeans), with a goal to discover some of the local shipwrecks, including the Augustin Frenel, which lies in 30m depth (100 ft) and measures 53 meters in length (174 ft)! Beautiful visibility.I started with a first exploratory swim to get my bearings and a sense of the ship’s scale, reached the stern, and took a couple of atmospheric shots near the propeller. Then, I went for a series of swims along the wreck (3 round-trips) and took over 700 shots! The other divers probably wondered who was that mad photographer that kept swimming back and forth without appreciating the colourful sponges and other marine life covering the wreck.
The Grec and Donator wrecks (France)
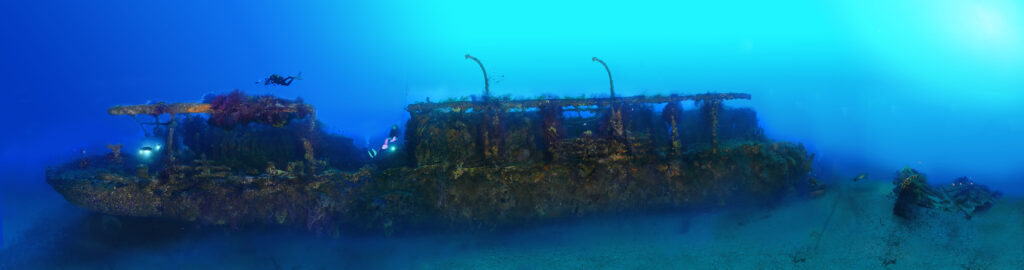
These two iconic shipwrecks from the south of France are located quite close to each other, East from Porquerolles island, and both went down due to World War II mines, only one month apart. The Grec sank on November 10thand the Donator on December 3rd, 1945, and both sit in 50m of water (165 ft).
In my view, these are amongst the most beautiful wrecks in the world. They are covered in purple gorgonians and marine life abounds all around them: my panoramic shots had to include colours, to do these ships justice. This is easier said than done: I had to found powerful lights and needed to wait for suitable weather and good visibility. I already had an ambient light panorama of the Donator, so the perspectives were clear in my mind, but the weather and my personal availability didn’t seem to line-up and months passed without a chance to do these dives. Finally, in 2017 everything came together and I could dive the Donator twice. I dedicated my first dive to the front and the superstructures, while I covered the deck and the stern in the second one.
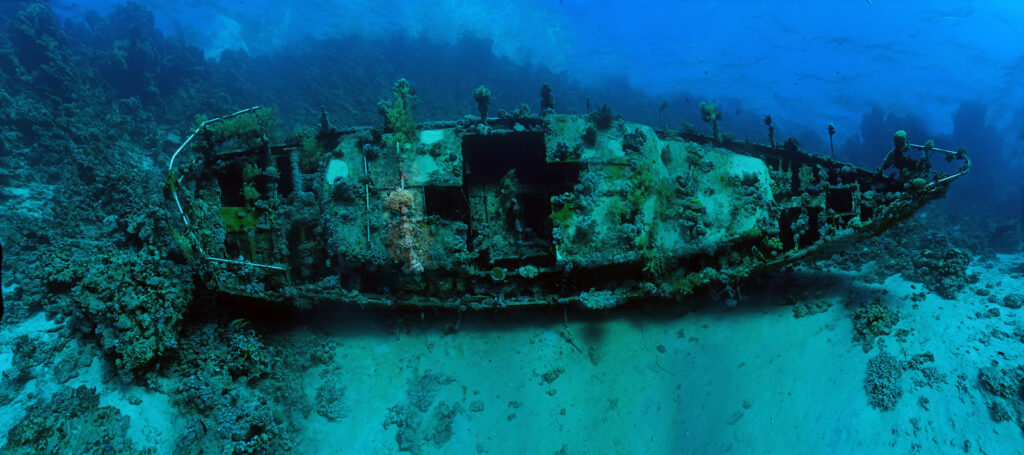
The St John’s reef sailboat
When it comes to photographing a “small” wreck of 15m length (48 ft) in clear water, assembling 20 photos into a panorama might seem un-necessary. After all, you could capture that whole wreck with a single wide-angle shot, right?
Well if you take time to zoom in the final image, then the advantages of the panoramic approach stand-out. By working closer and photographing the wreck bits by bits, my panorama’s resolution is much larger: the final jpeg weighs 80 MB as opposed to 20 MB for a single shot. So much details are captures that you can count the polyps on corals! As I often say, the interest lies in the details…
The Karwela (Malta)
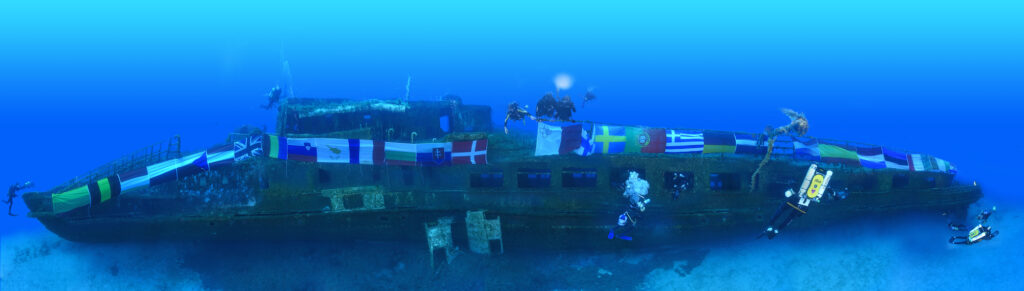
While it was holding the presidency of the European Union, Malta decided in June 2018 to decorate one of its shipwrecks with flags of the EU members, and I was invited to photograph this event.
The Karwela lies at a 40m depth (132 ft) and a team of tek divers was in charge of setting up the flags. Perhaps they were pressed in time or suffered nitrogen narcosis, but some of the flags ended up upside-down! This didn’t please the organisers, but I managed to fix the problem on most flags, courtesy of Photoshop’s mirror effect.
About the author
Nicolas Barraqué is a French underwater photographer, entrepreneur and founder of French diving magazine Plongez! and of the Galathea festival. His images have received over 100 national and international awards. During the last 20 years, he has participated or instigated more than 100 photographic exhibitions all over France (including in the iconic Eiffel tower) and internationally (Monaco, Spain). The aim was to raise public interest in marine life conservation, and an estimated that 100 Million people have discovered the beauty and fragility of the Mediterranean sea, by attending one of these exhibitions.
In consideration for all of Nicolas Barraqué’s actions in championing the marine environment, the Accademia Internazionale di Scienze e Tecniche Subacquee (International Academy of Underwater Sciences and Techniques) awarded him the Golden Trident in 2021, the equivalent for the marine world of the Fields Medal for Mathematics. Previous French recipients of this prestigious award include Jean-Jacques Cousteau (1961) and Laurent Ballesta (2017).


Comments